Step 1: As Maven is a Java tool, so you must install Java in your system to proceed with Maven installation.
Please refer this link for java installation, if you have not installed Java. How to Setup Java in Windows Operating System?
Please refer this link for java installation, if you have not installed Java. How to Setup Java in Windows Operating System?
Step 2: Download Apache Maven. Download Maven

Step 4: Open “settings.xml” file. Path à “apache-maven-3.3.9\conf\settings.xml”
Step 5: Optional à you can change maven repository location otherwise maven automatically downloads all file at default location (${user.home}/.m2/repository).
Change Maven Repository location if requires. Add below tag in “settings.xml” to change Maven repository location. e.g C:/MAVEN_HOME

Step 6: Click on Start Menu

Step 7: Right Click on “Computer” and then click on “Properties“

Step 8: Click on “Advanced system settings”.

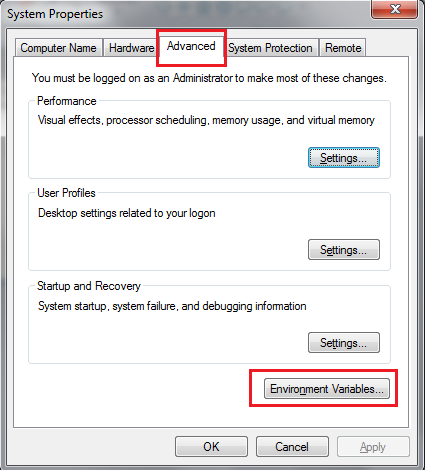
Step 9: Click on “Advanced” tab and then click on “Environment Variables”
Step 10: Click on “New…” to add MAVEN_HOME variable

Step 11: Provide “Variable name”à MAVEN_HOME
“Variable value” à Maven installation path (e.g- E:\Programs\apache-maven-3.3.9)

Step 12: Select “Path” from System variables and then click on “Edit…” button

Step 13: Add Maven installation path with Bin directory in “Path” variable. e.g. -E:\Programs\apache-maven-3.3.9\bin

Step 14: Verify Maven: Open “Command Prompt” and then type “mvn -version”.
You should get maven version details as below screenshot, it means Maven has been successfully installed in your system. Cheers !!

No comments:
Post a Comment